Multi-Factor Authentication (MFA) is a security method that requires multiple factors to verify a user's identity before granting access to systems or accounts.
In Zenvia Service, MFA adds an extra layer of protection and security as it prevents unauthorized access.
This article provides instructions on how to set up MFA, add it to your profile, and the necessary steps to activate it.
How to Set Up Multi-Factor Authentication (MFA)
To activate MFA, follow these steps:
1. Log in to your account;
2. Go to Settings in the side menu;
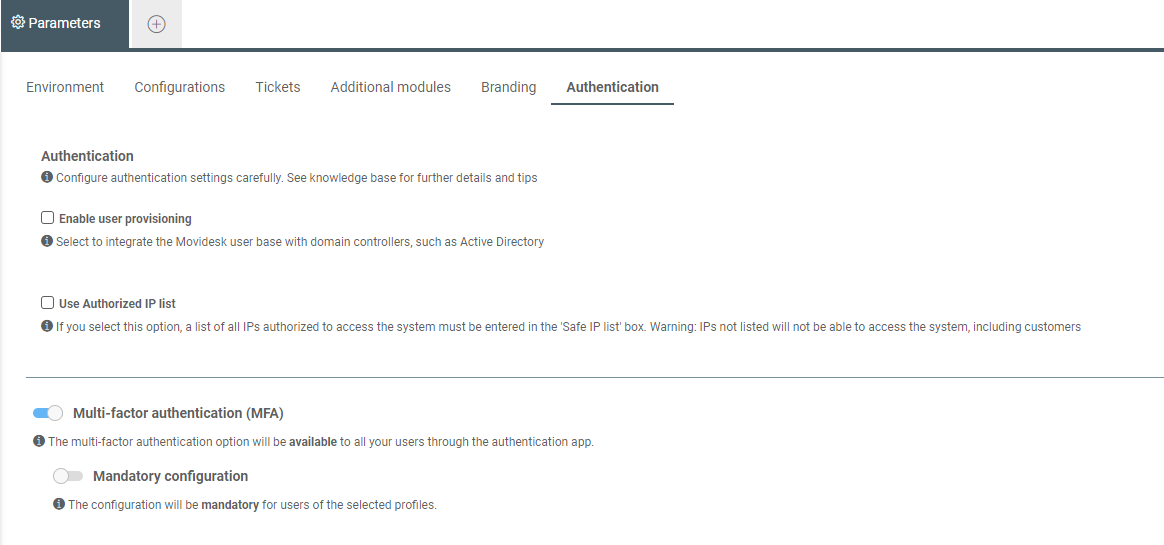
3. Click on Parameters in the subcategory Account;
4. Select the option Authentication in the horizontal menu;
5. Enable the Multi-Factor Authentication (MFA) button;
6. Click on Save.
Once activated, it will automatically be available as optional for all your users. Users can choose to enable MFA individually in their profiles.
⚠️Attention: It is not possible to add or activate MFA on other people's profiles; it is an individual process.
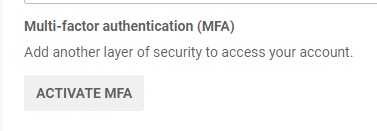
Activate MFA on your profile using an authentication app
To activate MFA on your profile:
1. Go to Profile > Edit Profile and click the Activate MFA button;
2. Register an authentication app;
💡Tip: It can be Google Authenticator, Microsoft Authenticator, among others.
3 Scan the QR Code or manually enter the key displayed on this screen into your external authentication app;
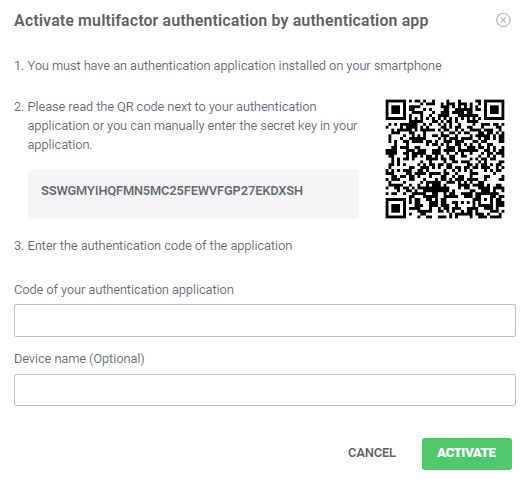
4 Enter the verification code from your external app into the Zenvia Service profile fill field;
💡Tip: It's optional to enter the device name, but it helps to remember the external app you are using.
5 Click on Activate.
Once saved, the authentication process is active.
Each time you log in, you will be prompted for a confirmation code. By entering the code correctly, your access will be granted. Incorrect codes will not be accepted.
How to disable MFA on your profile
To disable MFA on your profile:
1. Select the path Profile > Edit Profile;
2. Click the Deactivate button;
3. Enter the confirmation code from your external app to confirm the action;
4. Press the Deactivate button.
Done! Your deactivation was successfully completed. The next time you log in, you will not need to enter the authentication code.
Mandatory MFA Configuration and Activation
To enable this option, go to Settings > Parameters > Authentication and enable the Mandatory Configuration button within Multi-Factor Authentication (MFA).
By making authentication a mandatory factor, you choose between: All users or Specific profiles.
Mandatory MFA for All Users
Choosing All Users means that all profiles will be required to enter the authentication code when logging in. Whenever new accounts are created or passwords are recovered, activation of application-based authentication will be requested at the login stage.
⚠️Attention: Even if you deactivate MFA on your profile, you will need to register a new code when logging in again, as this security factor is active as mandatory for all profiles.
Account Creation
To activate MFA after creating your account, follow these steps:
1. Register an authentication app (Google or Microsoft, for example);
2. Scan the QR Code or manually enter the code displayed in the external authentication app;
3. Enter the external app's verification code in the Zenvia Service input field;
4. Register the device name;
5. Click on Activate and you’re done!
Password Recovery
For password recovery, the process is similar to account creation when mandatory MFA is active.
After clicking on Forgot my password on the login area, enter your email and click Send.
You will receive an email for password recovery. Open it and click the link to set a new password. After setting it, you will need to activate multifactor authentication.
💡Tip: It is the same step-by-step process as account creation.
Mandatory MFA for Specific Profiles
If you choose the Specific Profiles option, you need to select the types of profiles for which you want to make authentication mandatory. Agent, administrator, among others.
After this, just click the Save button and you're done!
When setting up mandatory MFA, the process of enabling app-based authentication is required from the login. Register an authentication app and enter the verification codes to access the solution.
⚠️Attention: For security reasons, whenever there is a password change in the profile, the authentication code from your app will be required to confirm the action.
Is it possible to remove MFA from a user's registration?
Yes. If access to the authentication app is lost, it is possible to ask someone with an admin profile to remove the MFA from that user's registration.
The person with the admin profile will follow these steps:
1. Click on People in the side menu of Zenvia Service;
2. Search by the user's name or email;
3. Press the Deactivate button;
4. Confirm the action to deactivate the multifactor authentication for this user's profile.
After the MFA removal, the user will need to register a new authentication app to be able to log in to the system.
⚠️Attention: Only users with this type of profile can deactivate third-party MFA.