In this article you will learn:
- How to enable the asset management module
- How to assign permissions for asset registration
- How to perform additional registrations
- How to register an asset
- How to apply an asset to a ticket
- How to apply an asset to a macro
- How to apply an asset to a trigger
The asset management module allows you to control your company’s assets and associate them with your clients and/or agents, providing a bilateral view, both of the asset (informing who its users are) and of the user (informing which assets they use). This allows you to specify in the ticket the asset to which the request refers and, from there, generate a history regarding it. You can also combine the functionality of this module with other system features, making your experience even more enjoyable.
Enabling the asset management module
The asset management module is disabled in your Movidesk. To use this system feature, a quick procedure must be carried out. To do this, in the "Account" menu, go to the "Parameters" option and select the "Additional Modules" tab. Then, scroll down to the bottom of the screen and enable the "Use the asset management module" parameter.
Once the parameter above is set, just click "Save". Then press "Ctrl + F5" on your keyboard, or log off and log back into the system. You will see that a new menu will appear on the main screen of your Movidesk. Asset management has been enabled.
Assigning permissions for asset registration
By default, this module is enabled only for administrators, but if you want to enable it for agents, you just need to activate some parameters so that they can register and/or indicate assets used in the registration of people, adding greater control over their information.
Asset registration permissions are configured within the user access profiles. To configure these permissions, from the system’s home screen, go to "Settings" and in the "people" menu, click on "Access Profiles". Then, select the desired access profile.
After accessing the profile to which the permissions will be assigned (in our example it is the agents’ profile), select the "Asset Management" tab.
In the asset management tab, the system displays parameters that allow you to grant (or deny) permissions to register them. These permissions are divided between registering asset categories, manufacturers, brands, models, asset statuses, and locations. You can enable one or more parameters (including all), as desired.
By using the scroll bar and moving the screen down, two additional parameters can be seen. They are "Allow asset registration" and "Allow the indication of assets used in the registration of people".
In both parameters, three options are presented for granting permissions in asset registration and indication.
Any category - This option allows you to register/indicate any asset, regardless of category.
Only assets from selected categories - By selecting this option, you can configure access to specific categories, automatically denying others not selected.
Do not allow - Selecting this option denies asset registration/indication permissions.
After setting the parameters, click on "Save" and the changes will be saved in the system, granting (or not) permissions to users of the configured access profile.
After enabling the use of the asset management module in your Movidesk, the system will present a specific menu for this feature within the settings screen, below the automation menu. In this menu, you will be able to register categories, manufacturers, brands, models, statuses, and locations, which will help enrich the information in asset registration (it is worth noting that these registrations are not mandatory. You can, for example, choose to register brands and not register manufacturers, and so on).
Next, we will specify each of these registrations.
- CATEGORY REGISTRATION: Through this type of registration, it is possible to list assets by categories, allowing for the assignment of sub-levels for more specific grouping. To register a category, simply access the "Categories" option and then click on the "+" option, which will be highlighted at the top of the screen.
After completing the above procedure, the system will present a new window for you to enter a new category. Follow the example below for creating a new category called "Monitor".
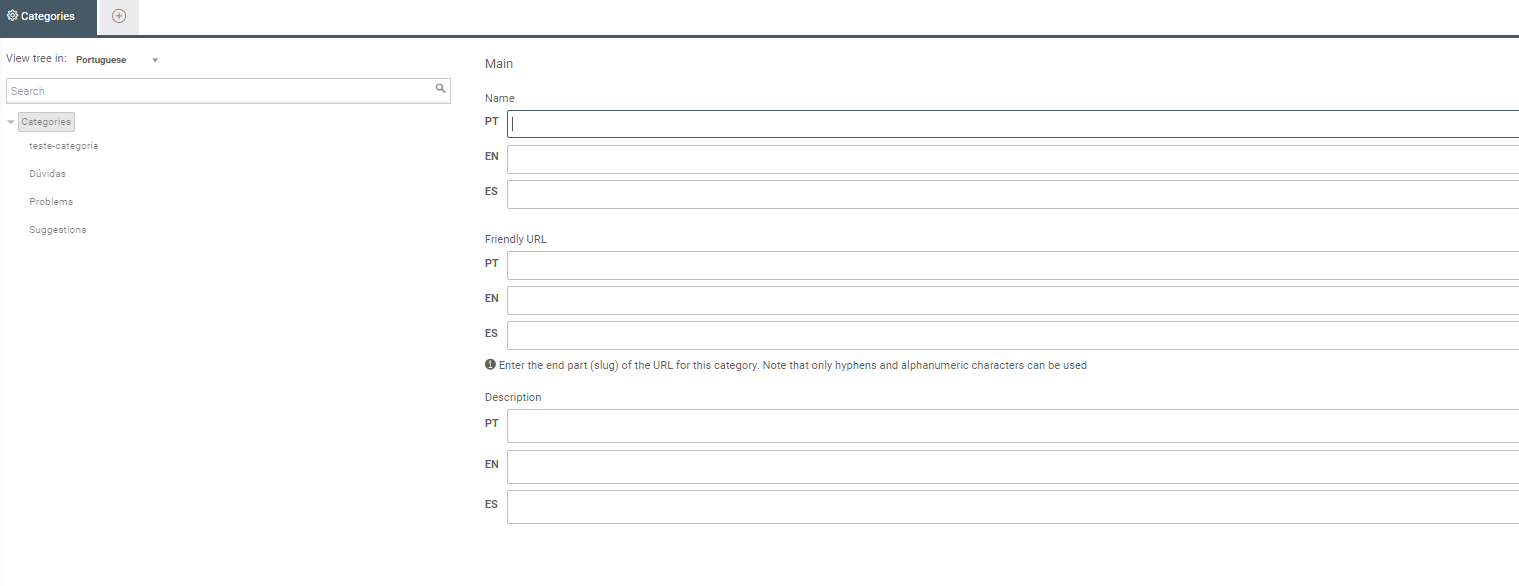
Note that it is possible, in addition to defining a name, to assign a description to the category (with this assignment being optional). After entering a name (and optionally a description), simply click on "Save". The information will be saved and a new category will be listed.
To create a subcategory, simply click on the category that will serve as the root and perform the same procedure as before. Note that once created, this new category will be listed below the previously selected root.
You can disable, enable, delete, and even export categories to Excel using the "Options" box displayed at the top of the screen.
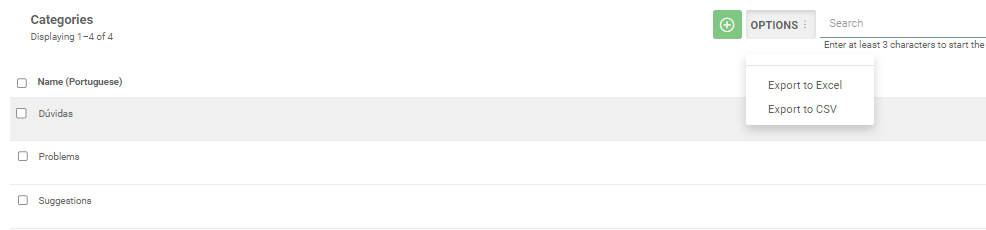
Still in categories, you can perform searches by filtering through enabled and disabled categories, as well as searching by keywords.
💡 TIP: Both the options box and the search box are available for you in all items of the asset management menu.
- MANUFACTURER REGISTRATION: As the name suggests, this option allows you to register the manufacturers of the assets used in your company. To register a manufacturer, go to the "Manufacturers" option and click on "+".
After doing this, the system will present a field for registering the manufacturer. Just type in the desired manufacturer’s name and then click on the "Save" option. The information will be saved, and the manufacturer will be enabled.
- MANUFACTURER REGISTRATION: This item allows you to register the manufacturers of your company's assets. To register a manufacturer, go to the "Manufacturers" item and then click on "+".
The system will display the brand registration screen. Note that it is possible to link a specific brand to a manufacturer; however, this link (manufacturer x brand) is not mandatory.
After registering the desired information, click on "Save". The information will be saved, and the brand will be enabled.
- MODEL REGISTRATION: In addition to manufacturers and brands, the system also allows for the registration of asset models. To register a new model, simply access the "Models" item in the asset management menu and click on the "+" option.
After doing this, the screen for model registration will open. Note that, as seen earlier in the brand registration, when registering a new model it is possible to link it to a brand and a manufacturer.
After registering, click on "Save". The changes will be saved and the new model will be enabled.
- STATUS REGISTRATION: Just like with tickets, it is also possible to assign statuses to assets. The system defaults to the statuses "In stock", "In maintenance", "In use", and "Out of service" pre-enabled, but you can change them or add new ones, and even delete statuses. Registering a new status for assets is very simple. Just access the "Status" item in the asset management menu and click on the "+" option.
The status registration screen will open. Note that registering a status for assets is slightly different from the same procedure for tickets, as there is no need to provide a base status. Simply provide the name of the desired status.
Then select the "Save" option. The new status will be created and enabled.
- LOCATION REGISTRATION: When used, this item allows for greater control over where a specific asset is located. To register a new location, simply access the "Location" item in the asset management menu and then select the "+" option.
The system will open the field to register the location (which is at your discretion). After entering the location to be registered, click on "Save".
The new location will already be properly enabled and ready for use.
After completing the additional registrations (category, brand, model, status, location, manufacturer), registering an asset is very straightforward. From the system's main screen, access the menu 
Upon accessing the menu, you will find the "+" option at the top of the screen.
A new tab will open within Movidesk, displaying fields to register a new asset. Note that previously completed registrations will automatically appear as options for certain fields, facilitating the registration process.
NOTE: The fields category, manufacturer, brand, model, location, and status are not mandatory. However, for these fields to be filled in, prior registration (as done earlier) is necessary.
By clicking on the "Other information" option, the screen will expand and additional registration fields will be displayed.
After entering the asset data, click on "Save". The registration should be saved successfully (however, unlike other screens in the system, you will remain on the same screen).
Still on the asset registration screen, just below the "Save" option, the system presents five navigation tabs for better organization of the information related to the asset registration.
- Main: This tab is used for the actual registration process of the asset (as demonstrated earlier).
- Used by: Allows you to specify who the users of this asset are. To do this, simply search for the person's name through the search box. After entering the users of this asset, just click on "Save" and the changes will be recorded.
💡 TIP: Pay attention to the detail in the asset name information. This data will be presented as a link; a single click will automatically direct you to the record of the asset in question.
- Attachments: Allows you to add and view files (images, documents, spreadsheets) attached to the asset record.
- History: This tab displays the list of tickets involving this asset, allowing you to obtain a detailed history of it. In this tab, you have the option to export the information to Microsoft Excel, as well as perform detailed searches through the search field, similar to the ticket view screen.
- Schedules: Through this tab, you can check all the tickets with automatic opening scheduling related to the asset in question. As with the previous tab, it is also possible to export the information from this tab to Microsoft Excel, as well as perform more specific searches through the search field.
After registering or editing an asset, you will be able to find it on the main screen of the "Assets" menu along with all other assets registered in your Movidesk.
Just like in other system listings, on this screen you can perform specific searches through the search field, as well as sort items from information columns.
It is also possible to select one or more assets from the list and use the options box to open all selected items, delete them, or export them to Microsoft Excel. On the left side of the screen, you can observe the category structure, as well as perform searches by specific categories by name. Note that this part of the screen is collapsible, allowing retraction to give more focus to the asset listing.
Application of assets to tickets
Assets can be related to tickets. Once the asset management module is enabled, the system automatically creates a new field on the ticket creation screen, called "Assets". Through this new field, it is possible to point out assets related to the ticket (one or more), keeping a history along with their registration (as seen previously).
In case of ticket creation automatically via scheduling, the system will fetch the assets pointed out in the source ticket. Similarly, child tickets created via triggers and/or manually will also inherit the asset information pointed out in the parent ticket.
NOTE: Keep in mind that to link an asset to a ticket, the asset must be registered in the system.
The asset field information is also displayed on the ticket print screen. To view this screen, simply click on the options box (next to the ticket status) and select the "print ticket" option.
Application of assets in triggers
Assets can also be used in trigger configurations. You will find them both among the conditions and among the trigger action options. See in the example below a demonstration of the configuration. Let’s assume there is a file server and we want to automatically link it to all open tickets about the topic files.
We created a trigger named "Assign asset - File server".
Then, we define that whenever the "Ticket is..." "Open" and the "Subject" "Contains" the word "files".
Then, the trigger action will be "Include asset(s)", which, as desired, will be the "File server".
Having completed and saved the trigger configuration, let’s see a demonstration of its application in opening a ticket, as defined in the conditions, step by step.
Application of assets in macros
Macros also integrate with the asset management module, offering possibilities for actions on them. We simulated a model where, when applied, the macro removes an asset pointed out in a ticket and inserts another in its place. Follow the images below.
After saving and properly enabling, we can apply the macro normally.