The active call is a telephony feature that allows you to make calls from Movidesk and log them as actions in existing tickets.
By default, the active call parameter is disabled. Therefore, to make calls, you need to enable it and link the extension to the agent who will make the calls.
In this article, you will see:
- How to enable the active call
- How to register the agents who will make the calls
- How to register the customer number who will receive the call
- How to make calls
- How to integrate with an API for active call
How to enable the active call
First, you need to enable the module in your Movidesk. To do this, go to Settings > Account > Parameters > Additional Modules. In the "Telephony" group, activate the parameter “Use external API for calls”.
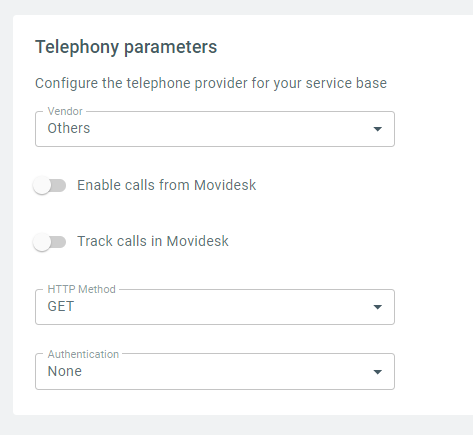
With the changes saved, refresh the page and a new option will appear in the Telephony menu. Go to Settings > Telephony > Telephony Parameters.
On this screen, you need to select your provider, with the options being Simple click or Others.
Select the option Allow calls from Movidesk and enter the URL in the telephone exchange provided by your provider.
If you want to monitor the calls, select the option Monitor calls through Movidesk and enter the URL in the telephone exchange for this purpose.
In both fields, you can use the available placeholders: {call.source.number}, {call.destination.number}, and {call.response}.
When selecting the Others option, in Provider, you will need to define the method and type of authentication that will be used.
In the method, you can choose between GET or POST, according to the documentation from your telephony service provider.
In the GET method, you must return the CALL-ID of the call, a unique identifier for that call with that telephony provider.
In the POST method, within the response JSON, there must be a call_id key, a unique identifier for that call with that telephony provider.
The authentication type can be None, Username and password (login), or Token, according to the documentation from your telephony service provider. You need to provide the data according to the chosen type.
Don't forget to save your information.
How to register the agents who will make the calls
To be able to make a call, the number must be registered in the people database. In this case, go to Settings > People and select the agent. Use the "Main" tab and go to "Other contacts".
Add the contact type in the combobox, which can be mobile phone, home phone, extension, among others, depending on your telephony service. In the field next to it, enter the phone number or extension.
Once this information is filled in, your system will be ready to make calls.
How to register the customer number who will receive the call
For the call to be made, the customer's number must be in the people database. To do this, go to Settings > People and select the customer. Use the "Main" tab and go to "Other contacts".
Add the contact type in the combobox and, next to it, enter the phone number or extension.
How to make calls
The phone icon will appear on the left side of the screen, next to the requester's name.
When you click on the icon, a pop-up will appear asking you to confirm if you want to make the call with the registered phone number. Click on Call. For this, your Simples Clique (or similar) application and/or your line must be operational and available.
Once the call starts, a modal will appear showing the real-time duration of the call. If the monitoring parameter is activated, once the call ends, the modal will close and the action will be logged in the ticket.
If you close the ticket after starting the call, you can reopen it by clicking directly on the modal.
If the monitoring parameter is not activated, the Hang Up button option will be available in the modal to end the call. Similarly, once the service is completed, the action will be logged in the ticket.
One situation that can occur is the following: the call was ended in Movidesk, but the API still shows the call as ongoing, probably because it was not answered. When this happens, the call can only be redone by Movidesk when the provider’s API returns the call termination to Movidesk. Only when there is a return will the icon to make the call appear again. We emphasize that this action is independent of our efforts and is subject to the provider's API configurations.
How to integrate with an API for Active Calls
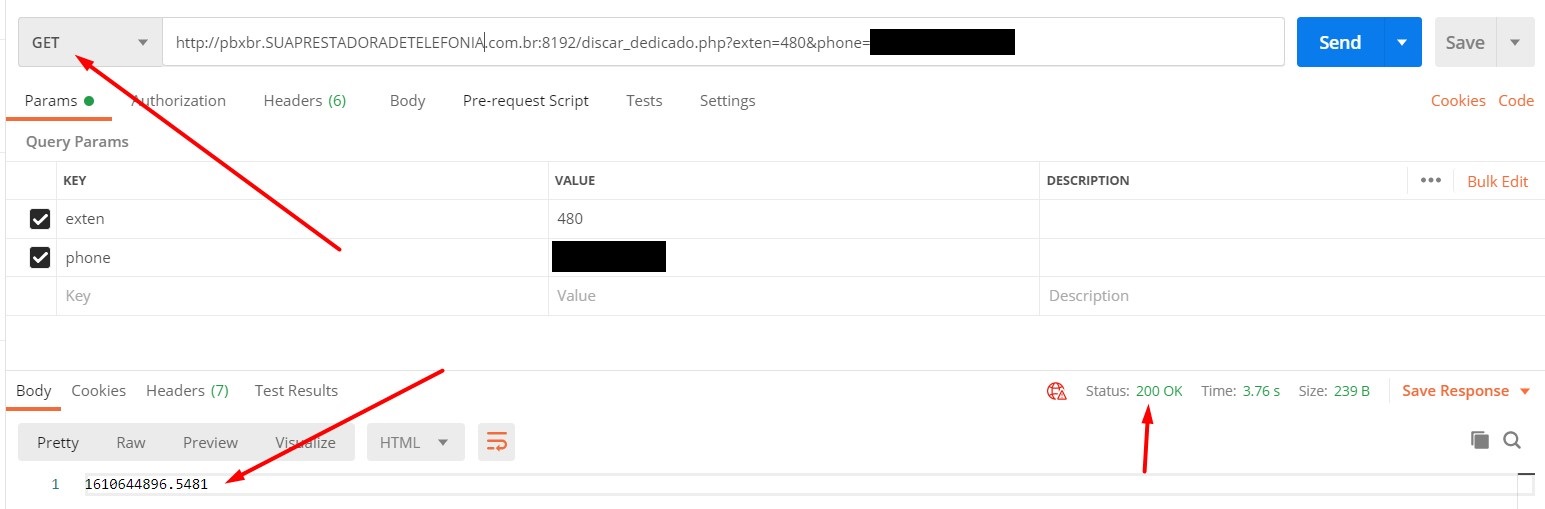
1) Make the First Dialing
Example:
- http://yourserver.simplesclique.com.br:8192/dial.php?exten=210&phone=0123456789
exten = Extension
phone = Customer's phone number
NOTE: This link may vary depending on the integration; Movidesk will send this information with defined placeholders, as shown in the example:
Example URL: http://yourserver.com.br:80/dial.php?from={call.source.number}&to={call.destination.number}
When the call is answered, the ID of the recording should be returned to be concatenated with the VoIP system address.
Recording URL
- Example: http://yourserver.com.br:8192/$id.mp3
NOTE: The recording link is immutable; Movidesk will concatenate the server link with the call ID, like this:
Example: http://server.com/{Recording Id}.mp3 (The format will always be MP3
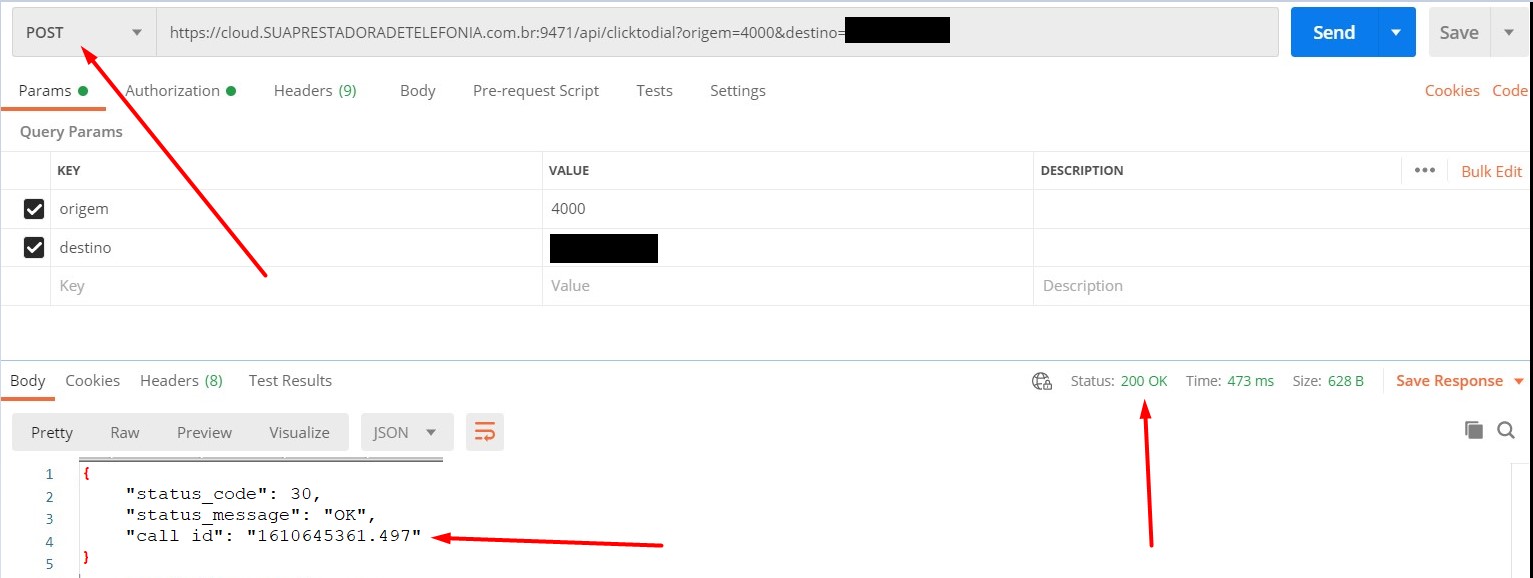
2) URL to monitor the call
URL: http://yourserver.com.br:8192/infochamada.php?id=<Id obtained when making the call>
- Example URL: http://yourserver.com.br:8192/infochamada.php?id=22222.1111
Example of an implemented URL, using Movidesk placeholders:
- Example URL: http://yourserver.com.br:8192/infochamada.php?id={call.response}
2.1) STATUS Field
The returns of this field are related to the call, where:
- ANSWERED: Call completed, i.e., answered by the client
- NOANSWER: The client did not answer the call
- BUSY: The client's phone is busy
- FAILED: The call did not complete successfully. E.g.: Power went out during the call.
NOTE: This URL returns two pieces of information, the Call Status and its duration. The following format should be preserved for the correct functioning of the integration.
- Status: <Call Status> - Duration: <Duration in seconds>
Example return: Status: ANSWERED - Duration: 57