In this article, you will learn how to publish articles.
To publish articles in the knowledge base, you need to have your base already set up. Click here to learn how to do this.
Once your base is set up, to publish your first article, go to the menu and click on Settings. In the Knowledge Base field, click on Articles.
To write a new article, just click on the plus sign, the green button at the top of the screen.
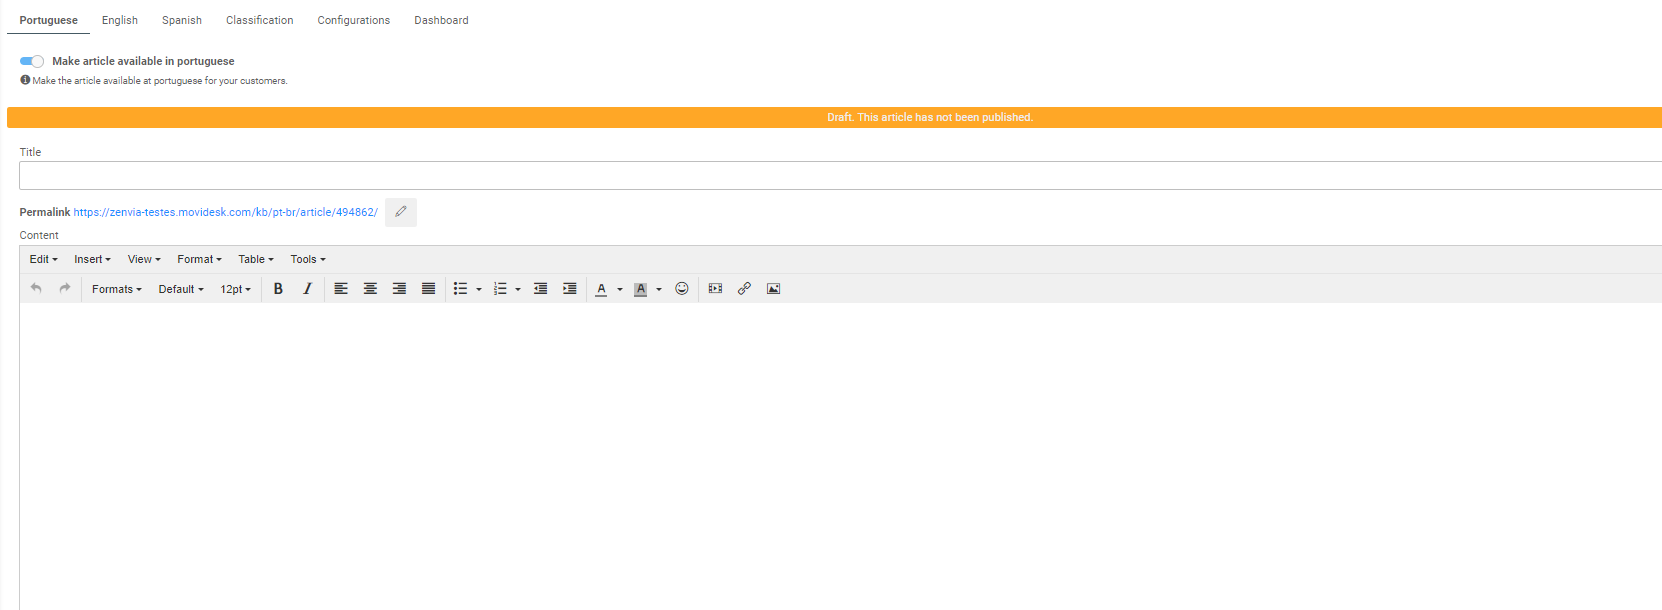
A new tab will open with fields to write the Title, the Content, and the Summary of the article. Additionally, a series of Settings regarding the article's visibility and its classification according to the menu and category, among other options, will appear.
1. Title: field where you add the title of your article.
2. Permanent Link: link generated to access your article. You can edit it as you wish by clicking on the pencil icon.
3. Content: body of the text, the article itself. You can insert links, images, videos, gifs, and HTML content, and there are various configuration tools available. Each attached file must be no more than 10 MB.
4. Summary: brief description of the article's content that will be displayed in the article search. It is not required. In this case, the search will show the first characters of the text.
Settings when publishing an article
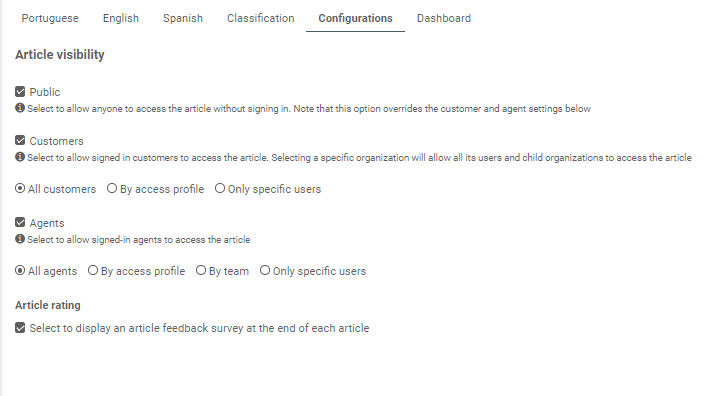
In the settings, you can define aspects regarding the visibility of the article to be published.
1. Article visible in the help center: choose the checkbox options (one or more) that you want to select to set the visibility of your published article.
2. Public: the article will be visible to the general public.
3. For registered customers: the article will be visible only to customers logged in to Movidesk. Within this configuration, you can also choose one, among the three radiobutton options: Allow all customers, Allow the following access profiles or Allow the following people.
4. For agents: the article will be visible only to agents logged in to Movidesk. Within this configuration, you can choose one, among the four radiobutton options: Allow all customers, Allow the following access profiles, Allow the following teams or Allow the following people.
5. Article Rating: by keeping this option selected, you will allow readers to rate the published article.
TIP! You can keep fixed information for all agents and future agents by maintaining a category with internal information in the knowledge base. Just set its visibility to agents only.
Ratings when publishing an article
There are five fields that can be filled in the Classification section: menu, categories, services, tags, and related articles.
It is important to select the menu and category to keep your knowledge base organized and user-friendly for your customers.
Finally, you can also add attachments if needed. Each attachment should be no larger than 10 MB.
Publishing Your Article
To finalize, just click PUBLISH. However, if you want to keep it hidden for a while, for example, while you work on it, click SAVE DRAFT. You can PREVIEW how the article looks in the knowledge base by clicking this option. And if you decide to cancel the publication and do not want to save it, just cancel.
To edit or delete a published article, click on Settings > Articles, the grid with already published articles and drafts will appear on the screen.
Select the article you want to modify. A new screen will open, similar to the article publishing window. You can modify what is needed and republish, save as a draft, suspend, or delete the article.
Attention! When writing an article and saving it as a draft without publishing it, it will appear in the grid as a draft. However, when publishing an article and then making changes and saving it as a draft, it will remain as published in the grid, as it is indeed published. Changes saved as a draft will appear when opening the article, in an indicator bar above the title.

